At Bhoodarsh Saurshakti, we uphold the value of making solar energy accessible. So, in case you have ever wondered about how to install home solar inverter, this guide will answer all your queries. With the installation of a solar PC inverter for home, energy costs can be minimised and power reliability maximised. Let us take you through the necessary steps that lead to a safe and smooth DIY solar inverter installation.
Step 1: Choose the Right PCU Solar Inverter
Before anything else, select a solar inverter for your home depending on what sort of energy you require. Bhoodarsh Saurshakti brings to you highly advanced PCU inverters that integrate MPPT technology, intelligent charge control, and smooth switching from solar to battery or grid power.
Step 2: Plan the Installation Layout
Get a clear solar inverter installation checklist to ensure the presence of every component. Select a location for the installation of the inverter that is under shade, is well ventilated, and is dry, close to the main power panel. Planning forms an integral part of the solar PC inverter installation guide.
Step 3: Mount the Inverter Securely
Using wall brackets, install the inverter firmly at a height that is unreachable by any player and away from water contact. This is a crucial step in solar inverter safety installation to avert any accident or the solar inverter from getting overheated.
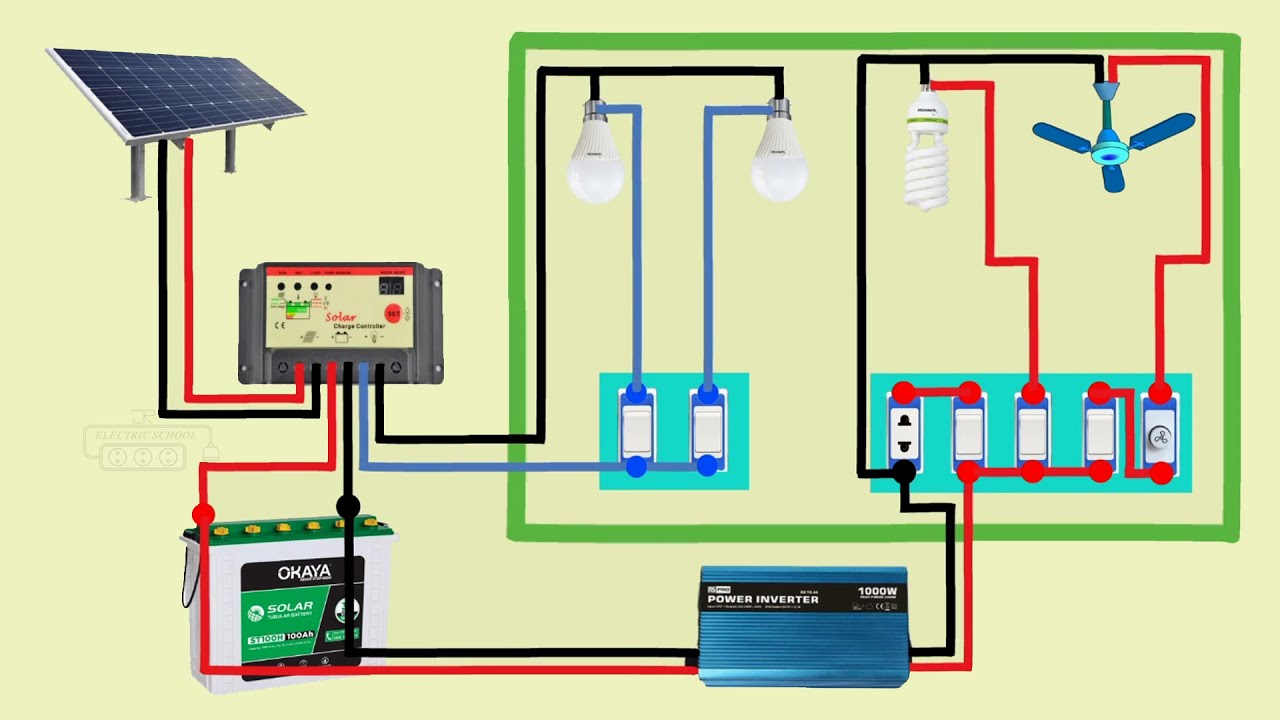
Step 4: Connect Solar Panels and Batteries
This is the next step in your solar inverter installation process for the wiring. Connect your solar panels to the input terminals of your inverter. Then, connect your batteries to the battery port with the correct polarity. Always refer to your solar inverter at home wiring guide with your Bhoodarsh Saurshakti system.
Step 5: Connect to the Grid (If Needed)
Connect the inverter to your home’s main distribution board if you’ve installed a hybrid or grid-tie system, allowing for smooth switching between solar and grid power. Help here is very much advisable if you have little or no clue, even in your Do-it-yourself solar inverter installation.
Step 6: Test the System
After wiring is complete, switch on the inverter to see whether your system is properly generating and distributing power. Using the digital display, monitor real-time data. A properly install solar inverter system equates to a smooth flow of solar power and backup on demand.
Step 7: Estimate Installation Costs
The solar inverter installation cost in Hyderabad will fluctuate depending on system size, wiring intricacies, and whether or not one hires contractors. Such that, a simple setting would be manageable on your own, and full systems with batteries would command an investment.
Solar Inverter Installation Tips from Bhoodarsh Saurshakti
- Always switch off the main power before wiring.
- Use certified cables and connectors.
- Label each wire for future reference.
- Keep your inverter in a cool and ventilated place.
- Follow the solar inverter installation tutorial as per the manual provided with your equipment.
Ongoing Care: Solar Inverter Maintenance Guide
After installation, it is important to adhere to a good solar inverter maintenance guide. Keep the inverter surface clean once a month, check the wiring annually, stay updated with software updates, and reach out to the Saurshakti support team for professional servicing whenever necessary.
Final Thoughts
Installing a solar PCU inverter at home is an ideal and green option. With precise planning, tools, and implementing safety precautions, you can confidently go for that home solar inverter installation cost. Whether you want to go all out for a solar inverter installation at home, or just do a simple solar inverter setup at home, or start small, Bhoodarsh Saurshakti is here to help you every step of the way.